Simple Syntax Highlighting
So, lately I have been working on a small tool to view and traverse JSON files.
Yeah, yeah, I know there’s a bunch of great tools online, there’s also jq and such, but I was so happy to have time to spend on Cocoa development that I coudln’t help myself.
This tool I mentioned allows one to also query the file using the same query syntax as another package I pushed to GitHub, uyaml, and that was a nice opportunity to implement a simple Syntax Highlighter. In case you’re look for a well-implemented solution, I’d suggest you to check Uli Kusterer’s UKSyntaxColoredTextDocument. Otherwise, keep on reading.
This post will probably cover two distinct parts: Parsing the query language, and implementing a syntax highlighter for it.
Parsing our Query Language
As I mentioned, the query syntax is quite the same as uyaml’s, and it is nothing super fancy. Suppose we have the following JSON payload:
{
    "contacts": {
        "f": [
            {
                "name": "Fefo",
                "email": "[email protected]"
            }
        ]
    }
}
…and we want to get Fefo’s email address. We can express that query in two distinct ways: using indexes, or a selector.
The first option would yield a query that looks like contacts.f[0].email, whilst the second one would allow us to be a little more flexible: contacts.f.(name = "Fefo").email. Both queries points to the same value for the structure above. So, how can we parse those queries? Great question!
Parsing can actually be done in several ways, from some really fancy ways using say, flex, to the most primitive, where we just implement a finite state machine and get done with it. Here we will use the second option, since the query syntax is quite simple.
Side note: Some readers may be feeling a urge to just drop a regular expression and be done with it. That’s another way of solving this, but I’ll stick with the FSM so we have an opportunity to build something from scratch.
Our queries are composed of three elements: keys, indexes, and selectors. Each one is separated by a dot, except for indexes, which uses something resembling a subscript operator. I don’t think we should be able to allow indexes to be applied directly to selectors, so let’s assume that for now.
In Swift, we can express those items using an enum:
enum Query {
    case key(String)
    case index(Int)
    case selector(key: String, value: String)
}
As we will also be working with syntax highlighting, it would be interesting to use the same parser to emit ranges of elements found within the query string. Let’s add another enum to wrap a Query value with its corresponding locations.
Side note: Here I wanted to separate results of selectors (
(key = "value")) into two segments, so we can colour each segment independently. This will probably yield some ugly code that we will need to refactor before having anything production-grade, but to keep things simple I’ll only include the “naive” approach here.
enum QueryElement {
    case simpleElement(_ element: Query, location: NSRange)
    case keyValueElement(_ element: Query, keyLocation: NSRange, valueLocation: NSRange)
}
Again, our parser will be a simple FSM. So let’s define all possible states for it:
enum State {
    case key
    case selectorKey
    case selectorOpenQuote
    case selectorValue
    case selectorEnd
    case subscriptValue
    case matchDotOrSubscript
}
…and also a few constants to allow us to reduce the amount of hardcoded values:
let LPAREN: Character = "("
let RPAREN: Character = ")"
let LSQUARED: Character = "["
let RSQUARED:Character = "]"
let DOT: Character = "."
let EQUAL: Character = "="
let QUOTE: Character = "\""
let ESCAPE: Character = "\\"
let SPACE: Character = " "
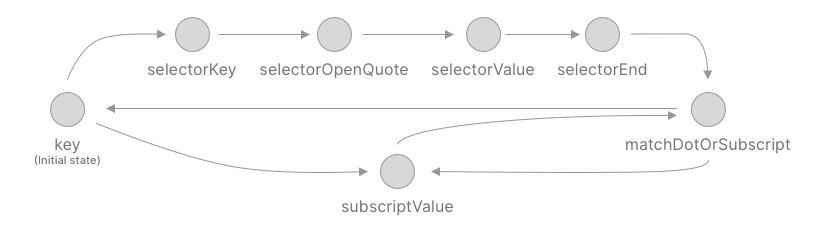
Each state has its own rules, which follows:
-
keymatches a single character until either aDOT,LPAREN, orLSQUAREDcharacter is found. This state also rejects input in case it finds aLPARENafter any text, since our selectors must begin right at the beginning of the query or right after aDOT. -
selectorKeymatches all characters until aEQUALis found. Obtained values are then used as thekeyvalue for our selector. -
selectorOpenQuotematches a singleQUOTEthat must follow the lastEQUALfound by theselectorKeystate. -
selectorValuematches all text until aQUOTEthat’s not followed byESCAPEis found. -
selectorEndmatches a singleRPARENthat must exists right after our closingQUOTE. -
subscriptValuematches all numbers after aLSQUAREDuntil anRSQUAREDis found. -
matchDotOrSubscriptmatches a singleDOT, a subscript start character ([) or expects the end of a query.
The following graph can express how states are transitioned:
Additionally, it’s important to have a way to emit errors. Let’s create another enum for that:
enum QueryError: Error {
    case emptyQuery
    case unexpectedToken(_ token: Character, position: Int)
    case unexpectedEOF
}
Finally, we can then implement the parser:
class QueryParser {

    // state stores the current parser state, which we will then use in a
    // switch-case structure to define behaviour for each of them
    fileprivate var state: State = .key

    // escaping indicates whether the last character was a escape (\), which
    // allows us to use double-quotes inside double-quotoes, for instance.
    private var escaping = false

    // Result retains all elements identified, and is returned to the
    // caller.
    private var result: [QueryElement] = []

    // startAt identifies where the current element started at. This is used
    // for keys and indexes. Selectors will use the other set of variables
    // prefixed with tmpSelector* and selector*
    private var startAt: Int = 0

    // Cursor indicates in which character in the query string we are
    private var cursor = 0

    // tmpKey retains the temporary value for keys and indexes
    private var tmpKey = ""


    // tmpSelectorKey retains the temporary value for a selector key
    private var tmpSelectorKey = ""
    // ...and the selector value
    private var tmpSelectorValue = ""

    // selectorKeyBegin represents the character index where the current
    // tmpSelectorKey started at.
    private var selectorKeyBegin = 0

    // selectorValueBegin represents the character index where the current
    // selectorValue started at.
    private var selectorValueBegin = 0

    // append is a utility function used to add a given character to tmpKey
    // and also set whether we will escape the next character.
    private func append(_ el: String.Element) {
        tmpKey.append(el)
        escaping = el == ESCAPE
    }

    // addResult is used by addSimpleResult and addComplexResult; it is
    // responsible for appending a new result into our result array,
    // reset our tmpKey, and set startAt to the current positition.
    private func addResult(_ v: QueryElement) {
        result.append(v)
        tmpKey = ""
        startAt = cursor
    }

    // addSimpleResult adds a key or index to the result array, and implicitly
    // uses startAt and the tmpKey length to set its location within the query
    // string
    private func addSimpleResult(_ v: Query) {
        addResult(.simpleElement(v, location: NSMakeRange(startAt, tmpKey.count)))
    }

    // addComplexResult adds a selector to the result array, using the provided
    // ranges to identify its inner components' location within the query string
    private func addComplexResult(_ v: Query, keyRange: NSRange, valueRange: NSRange) {
        addResult(.keyValueElement(v, keyLocation: keyRange, valueLocation: valueRange))
    }

    // feed takes a single character and handles it based on the current FSM's
    // state. This is the heart of the FSM, where all logic is implemented.
    private func feed(_ c: String.Element) -> QueryError? {
        cursor += 1

        switch state {
        case .key:
            if c == DOT && !escaping {
                addSimpleResult(.key(tmpKey))
                return nil
            } else if c == LPAREN && !escaping {
                // We should not have a previous string before a LPAREN
                if !tmpKey.isEmpty {
                    return .unexpectedToken(LPAREN, position: cursor)
                }

                state = .selectorKey
                selectorKeyBegin = cursor
                tmpSelectorKey = ""

                return nil
            } else if c == LSQUARED && !escaping {
                if !tmpKey.isEmpty {
                    addSimpleResult(.key(tmpKey))
                }
                state = .subscriptValue
                return nil
            }

            append(c)


        case .selectorKey:
            if c == EQUAL && !escaping {
                state = .selectorOpenQuote
                return nil
            }

            tmpSelectorKey.append(c)

        case .selectorOpenQuote:
            if c != SPACE && c != QUOTE {
                return .unexpectedToken(c, position: cursor)
            }

            if c == SPACE {
                return nil
            }

            selectorValueBegin = cursor
            state = .selectorValue

        case .selectorValue:
            if c == QUOTE && !escaping {
                state = .selectorEnd
                return nil
            }

            tmpSelectorValue.append(c)
            escaping = c == ESCAPE

        case .selectorEnd:
            if c != SPACE && c != RPAREN {
                return .unexpectedToken(c, position: cursor)
            }

            if c == SPACE {
                return nil
            }

            state = .matchDotOrSubscript
            addComplexResult(.selector(key: tmpSelectorKey, value: tmpSelectorValue),
                             keyRange: NSMakeRange(selectorKeyBegin, tmpSelectorKey.count),
                             valueRange: NSMakeRange(selectorValueBegin, tmpSelectorValue.count))
            tmpSelectorKey = ""
            tmpSelectorValue = ""

        case .subscriptValue:
            if !c.isNumber && c != RSQUARED {
                return .unexpectedToken(c, position: cursor)
            }

            if c != RSQUARED {
                append(c)
                return nil
            }

            if tmpKey.isEmpty {
                return .unexpectedToken(c, position: cursor)
            }

            addSimpleResult(.index(Int(tmpKey)!))
            state = .matchDotOrSubscript

        case .matchDotOrSubscript:
            if c == DOT {
                state = .key
            } else if c == LSQUARED {
                state = .subscriptValue
            } else {
                return .unexpectedToken(c, position: cursor)
            }
        }

        return nil
    }

    // finish is called after all characters are fed into the FSM and asserts
    // whether the final FSM state is valid for the end of the stream.
    func finish() -> QueryError? {
        if state != .key && state != .matchDotOrSubscript {
            return .unexpectedEOF
        }

        if state == .key {
            addSimpleResult(.key(tmpKey))
            tmpKey = ""
        }

        return nil
    }

    // parse is a class method that takes a string and feeds each of its
    // characters into the FSM, returning an error or result after it's done.
    public class func parse(query: String) -> Result<[QueryElement], QueryError> {
        let inst = QueryParser()
        for c in query {
            if let err = inst.feed(c) {
                return .failure(err)
            }
        }

        if let err = inst.finish() {
            return .failure(err)
        }

        return .success(inst.result)
    }
}
Implementing the Syntax Highlighter
With the parser in place, we’re ready to implement the syntax highlighter.
Once one searches the web on how to do that, several folks uses NSTextStorageDelegate or even subclasses NSTextView.
I personally find this to be a poor decision; it’s easy to mess things up when dealing with text, which will then create a myriad of errors and weird behaviours.
My solution is to just listen for NSText.didChangeNotification and do whatever we need to do there. This is interesting because it will allow us to quickly respond to user input, and since our query language is quite simple, handling this synchronously won’t cause the main thread to become unresponsive. The result is a syntax highlighting that updates as soon as the user types one letter.
So, to continue, we add a new TextView to the storyboard, hook up some outlets, and create a new class to handle events:
//
//  QuerySyntaxHighlighter.swift
//  jv
//
//  Created by Vito on 11/10/2021.
//

import Cocoa

class QuerySyntaxHighlighter {
    let notificationCenter = NotificationCenter.default

    var textView: NSTextView? {
        didSet {
            if let currentSubscription = self.subscription {
                notificationCenter.removeObserver(currentSubscription)
            }
            notificationCenter.addObserver(forName: NSText.didChangeNotification,
                                           object: self.textView,
                                           queue: .main) { [unowned self] notification in
                self.textViewDidChange(notification)
            }
        }
    }

    private var subscription: NSObjectProtocol?
}
At a first glance, there’s nothing really fancy going on. As soon as we receive
a new textView to observe, we remove the previous observer, if it exists, and
prepare a new observer to the received view. We then invoke textViewDidChange
once we receive a notification, and that’s it.
My implementation of textViewDidChange simply invokes another method called updateSyntaxHighlight:
    private func textViewDidChange(_ notification: Notification) {
        updateSyntaxHighlight()
    }
And this method is responsible for doing all the magic:
 private func updateSyntaxHighlight() {
        guard let tf = self.textView else { return }
        guard let lm =  self.textView?.layoutManager else { return }
        let result = QueryParser.parse(query: tf.string)

        // Remove all attributes...
        lm.removeTemporaryAttribute(.foregroundColor, forCharacterRange: NSMakeRange(0, tf.string.count))
        lm.removeTemporaryAttribute(.underlineColor, forCharacterRange: NSMakeRange(0, tf.string.count))
        lm.removeTemporaryAttribute(.underlineStyle, forCharacterRange: NSMakeRange(0, tf.string.count))

        if case .failure(let error) = result {
            switch error {
            case .emptyQuery:
                return // Nothing to do here!
            case .unexpectedToken(_, position: let position):
                lm.addTemporaryAttributes([
                    .underlineColor: errorColor,
                    .underlineStyle: NSUnderlineStyle.thick.rawValue,
                ], forCharacterRange: NSMakeRange(position, 1))
            case .unexpectedEOF:
                lm.addTemporaryAttributes([
                    .underlineColor: errorColor,
                    .underlineStyle: NSUnderlineStyle.thick.rawValue
                ], forCharacterRange: NSMakeRange(tf.string.count - 1, 1))
            }
            return
        }

        if case .success(let info) = result {
            for selection in info {
                switch selection {
                case .simpleElement(let el, location: let location):
                    switch el {
                    case .key(_):
                        lm.addTemporaryAttributes([
                            .foregroundColor: JColor.structure.color
                        ], forCharacterRange: location)
                    case .index(_):
                        lm.addTemporaryAttributes([
                            .foregroundColor: JColor.number.color
                        ], forCharacterRange: location)
                    case .selector(key: _, value: _):
                        break
                    }
                case .keyValueElement(_, keyLocation: let keyLocation, valueLocation: let valueLocation):
                    lm.addTemporaryAttributes([
                        .foregroundColor: JColor.structure.color
                    ], forCharacterRange: keyLocation)

                    lm.addTemporaryAttributes([
                        .foregroundColor: JColor.string.color
                    ], forCharacterRange: NSMakeRange(valueLocation.location - 1, valueLocation.length + 2))
                }
            }
        }
    }
The layout manager’s temporary attributes are also used by macOS to annotate
spelling errors and such, so we can also use it to decorate the text inside
it. JColor is a simple enumeration that returns colors based on the current
user’s theme, so we can use different colors for users using a light or dark appearance.
I found the result to be quite acceptable for such a small amount of code:

That’s not the code I’ll be shipping in the final application, but it may be helpful for someone getting started on a syntax highlighter or needing to have something alike in their app. :)
Oh, and jv is available on the App Store! If you’d like to use it, or just found this post interesting, consider purchasing it! It only costs 99 cents! <3